
I have a bad habit of looking at pieces of furniture, accessories, or jewelry and thinking... "I can totally make this!". This portion of my blog is all about taking my inspiration and turning nothing into a little something.
diy: wood plank headboard

Our
master bedroom headboard needed.... well... A headboard... to make more
of a statement. So, we took planks from the hardware store and a little
wood stain and turned them in to just that!
.JPG) |
| Don't mind the missing closet door! |


Stain each plank of wood using one cloth to apply and the other to spread the color evenly.

Once each plank has been stained, allow them to sit overnight to ensure they are completely dry.

Cut down each plank to desired length

Attach planks together using the metal brackets on the top, center, and bottom of the planks


Using your nail gun, attach the sheet of planks to the wall. Starting
with one on each corner and working your way in to the center of the
planks.


February 18, 2013
diy: monogrammed stationery
 |
| Bell'Invito Paperie |

I
love when my friends' birthdays come around. It is the perfect excuse
to experiment with a new DIY and share it with all of you! My newlywed
friend, Cori, had her birthday this week and what better way to
celebrate her day of birth and new Mrs. status than showering her with
monogrammed gifts?! My favorite part about this project is even after
the stationary has been used, you still have the custom stamp to
continue to put your name on e.v.e.r.y.t.h.i.n.g! Let's begin.

Where to buy:
**I purchased my paper supplies through Bell'Invito's DIY Paperie here.
I created my custom stamp with Photoshop (instructions below) and uploaded my design to Rubber Stamp Champ, here. It arrived within 5 business days.
Embossing supplies can be found at Michaels or Paper Source.

Part 1: Creating your monogram stamp
 Select your script font. I chose Mardian from Dafont (found here)
 If
you are downloading your font, click on the download once it is
complete and select the .ttf file. Then click install (same steps for PC
users).
If
you are downloading your font, click on the download once it is
complete and select the .ttf file. Then click install (same steps for PC
users).
 Open Photoshop and create a new file. Set your resolution to a minimum of 300 to create a hi-resolution image.
 Insert
a text box in the center of the file and type in the last name initial,
in uppercase letters, with your font size set at 50pt
Insert
a text box in the center of the file and type in the last name initial,
in uppercase letters, with your font size set at 50pt
 Do
the same for the first and middle initial on either side with your font
size set at 35pt. Arrange the placement of the two outside letters as
desired.
Do
the same for the first and middle initial on either side with your font
size set at 35pt. Arrange the placement of the two outside letters as
desired.
Save your file as a .jpg or .png (.png is my preference so you do not lose image quality) and upload it to your custom stamp order on rubberstampchamp.com
 I selected a 1"x2" stamp (found here) since my stationary is 4"x4.5".
For more stamp size options, click here.
Now the fun part...
Part 2: Creating Your Stationary
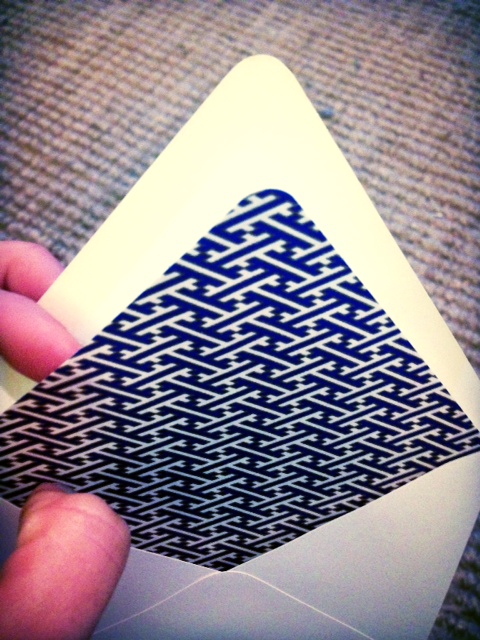
 First,
line your envelopes. Place the envelope liner upside down and apply
glue on the perimeter of the envelope flap. Slip the liner into the
envelope and press down firmly. Repeat until all envelopes are lined.
First,
line your envelopes. Place the envelope liner upside down and apply
glue on the perimeter of the envelope flap. Slip the liner into the
envelope and press down firmly. Repeat until all envelopes are lined.
 Next, grab your note cards, stamp, and embossing ink. Press your stamp into the ink pad a few times and stamp your note card.
 Sprinkle the embossing powder over the monogram. Make sure you completely cover the stamped area.
 Shake off the excess powder.
 Apply
heat with the embossing gun to the monogram while keeping at least
5"-6" in between the note card and the gun (you don't want to burn it).
The powder will start to rise. Once the entire monogram has risen and
glazed over, allow it to set for a few seconds, and you're done!
Apply
heat with the embossing gun to the monogram while keeping at least
5"-6" in between the note card and the gun (you don't want to burn it).
The powder will start to rise. Once the entire monogram has risen and
glazed over, allow it to set for a few seconds, and you're done!
You can use the embossing tools and your custom stamp on any fat service. I love adding the embossed look to my notebooks, too!
Annnnd.... I had to make myself a few set, of course!


I created my custom stamp with Photoshop (instructions below) and uploaded my design to Rubber Stamp Champ, here. It arrived within 5 business days.
Embossing supplies can be found at Michaels or Paper Source.
Part 1: Creating your monogram stamp


Save your file as a .jpg or .png (.png is my preference so you do not lose image quality) and upload it to your custom stamp order on rubberstampchamp.com

For more stamp size options, click here.
Now the fun part...
Part 2: Creating Your Stationary
 |
| Sorry I'm blurry. |


You can use the embossing tools and your custom stamp on any fat service. I love adding the embossed look to my notebooks, too!
Annnnd.... I had to make myself a few set, of course!


February 3, 2013
diy: ombre vase

If
you're like me, you have a collection of decorative accessories that
you have gathered throughout the years that you cannot bring yourself to
throw away (like my vast pillow collection in the living room closet).
You REALLY might need them someday, right? When we moved into our new
house last summer, I had a ton of things that didn't really fit the new
aesthetic. The horrid green vase below, is a perfect example. The vases
only had one spot in the house they could fit, size wise, but the
transparent green did not compliment the navy blue bookshelves that
would become their new home. They sat in the corner for a few months
collecting dust until one day, I had a light bulb moment. *DING!*
I
could attempt to spray paint these sad guys and if I fail, no harm.
It's not like they were making a good impression being all sad and dusty
hanging out in the corner. So, the vases and I headed out to the garage
for a spray paint makeover.
Supply List:
- Primer spray paint
- Base color spray paint (I chose white)
- Ombre color spray paint (I chose gold)
- Painting paper (or newspaper) to protect the ground surface

So
I want to start off this DIY by apologizing for the inconsistent
photos. This is a project I did a few months ago, but I still wanted to
share this with you. NOW - with that being said, let's begin!
Lay down your painting paper and place your item on top. Paint the entire surface with your primer.
Once your layer of primer has dried, paint the surface with your base color.
**Keep at least 8-10" between your
paint can and its victim. If you get too close, it can cause thick
sections and drips which show very easily. Keep your can moving from
left to right and release the trigger when you reach the outer most part
of your object on each side.


When
your base color is completely dry, flip your object upside down and
begin your ombre effect. You will use your same spray technique but once
you get to the point you want to achieve the faded look, you want to
gradually move your paint can farther away from the object.

Once your object is completely dry, bring it back inside, and enjoy!
January 17th, 2013
diy: statement earrings

So I have a slight obsession with unique jewelry. It all started a few years back when I wanted to make my girlfriends bracelets for the holidays. When they expressed how much they enjoyed them, I thought, "I could turn this into a small business". So I did for a year or two... and then life happened so, I recently stopped designing.
BUT - I will find any excuse to get back into it and make a little treat for myself friends.
My friend, Jennifer, came to me requesting I make the jewelry for her bridesmaids to wear on her wedding day. Lucky for me, I am one of them (So I get to keep a pair of these bad boys!).
My friend, Jennifer, came to me requesting I make the jewelry for her bridesmaids to wear on her wedding day. Lucky for me, I am one of them (So I get to keep a pair of these bad boys!).
With that being said, this DIY post is inspired by the making of the statement earrings that will be worn for my good friend's spring wedding. ENJOY!
 |
| These gorgeous earrings were my inspiration. By Auden Amelia II for $348 via ShopBop |
I will show you the materials I used and how I executed the DIY version of these amazing statement earrings. The best part? They were only $18!! You can use this technique with any statement earrings you have been dreaming of owning but your wallet is screaming, "Not a chance!"
First off - the supplies:

- various sizes of loose rhinestones
- stone settings the same size as your selected rhinestones
- rhinestone chain
- plated earring posts
- earring post backings
- stiffened felt
- super glue
- scissors
- exacto knife (if you need to cut out the center of your felt)
- needle nose pliers
- wire cutters
- pen
**Do not add the stone to your top setting just yet. we need to put the earring post through the back before the stone.

Place a small amount of super glue inside the setting before placing the rhinestone inside. Once your rhinestone has had a minute to dry, use your needle nose pliers to press down the tabs in front of the stone... like so...


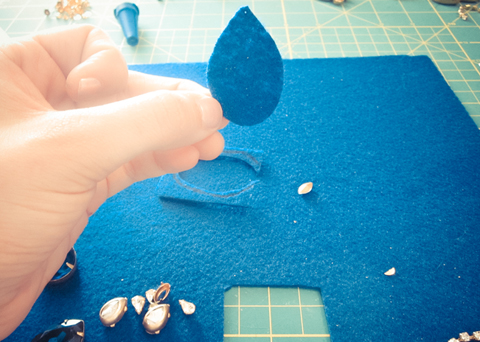
After you have placed all of the stones in their settings, begin to play with the placement of your stones on top of the sheet of felt.

When you are happy with the placement of your stones, gently trace around your stones.
Take your scissors and cut a few mm inside the drawn outline. This way, you should not see the felt backing once you place your stones on top.

Now, we are going to turn this felt into an earring! Take your top stone setting and your earring post and see how they fit with each other...

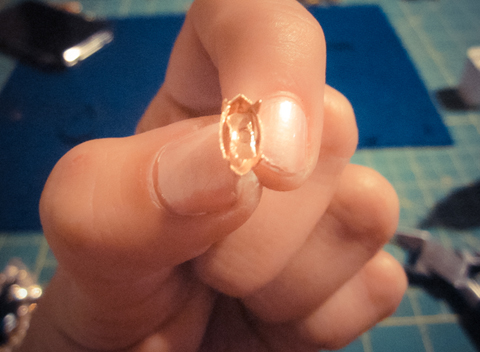
Once you have your post through the setting, add a small amount of super glue and insert your stone.

Allow your setting to dry for a minute or two. When your setting is dry, punch the post through the top portion of the felt cut out.

Begin to glue the remainder of your set stones on to the felt.


Measure out your rhinestone chain to finish off the bottom of the earrings and glue in sections as you wrap around the center stone.
Once you have completed your earring, trim the edges of felt with your exacto knife where it is needed... and ENJOY!
Resources:
felt & earring posts - Michaels


0 Comments:
Post a Comment
tell me what you think...